6-1 DOM 宒

當瀏覽器讀入一頁網頁時,就會根據此網頁的內容來建立相關的文件物件模型(Document Object Model,簡稱 DOM),這是一個階層式的物件模型,包含了網頁的各種物件,我們需要瞭解這些物件的性質和方法,才能產生動態的網頁,充分利用動態 HTML(Dynamical HTML,簡稱 DHTML)的各種功能。

Hint
這些物件的定義是根據 WWW Consortium 的標準來制訂,相關細節可以參考其網站:http://www.w3c.org

在文件物件模型中,所有的物件之間的關係,是由一個階層式的樹狀架構來呈現,請見下圖:
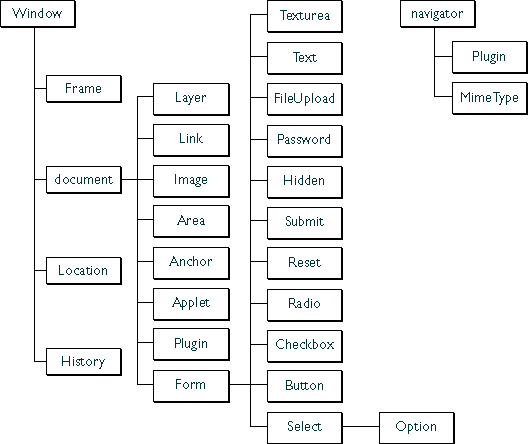
由上圖可以看出,window 物件是所有物件的始祖。而由每個物件的分支多寡,就可以大概看出此物件的重要性,例如, window 其下最重要的物件是 document,而 document 其下最重要的物件是 form。 這些物件各有不同的性質 (Properties) 及方法 (Methods),JavaScript 可利用這些性質及方法來建立網頁的互動性。

首先我們必須知道如何取得物件的性質,並進而改變這些性質,才能產生動態網頁。欲存取物件的性質,有下列三種方法:

  1. 用性質名稱來存取物件的性質(這是最常用到的方法):
    objectName.propertyName

  2. 用性質名稱來存取物件的性質(此種方法同等於前一種方法,其好處是:可將性質名稱以字串變數傳入):
    objectName["propertyName"]

  3. 用索引來存取物件的性質(比較少用):
    objectName[index]
首先,我們先看看 window 物件幾個常用的性質,利用這些性質,我們可以立刻抓出目前網頁的網址,以及視窗的座標等資訊,範例如下:

Example(winProp02.htm):

上述範例的原始檔如下:

原始檔(winProp02.htm):(灰色區域按兩下即可拷貝)
<html>
<head>
<meta HTTP-EQUIV="Content-Type" CONTENT="text/html; charset=big5">
</head>

<body>
<h2 align=center>window 物件的幾個基本性質</h2>
<hr>

本頁的網址(window.location):<script>document.write(window.location);</script><br>
本視窗(可顯示網頁範圍)左上角的 X-座標(window.screenLeft):<script>document.write(window.screenLeft);</script><br>
本視窗(可顯示網頁範圍)左上角的 Y-座標(window.screenTop):<script>document.write(window.screenTop);</script><br>

<hr>
</body>
</html>

你可以移動本範例的視窗,然後在更新此網頁,就會看到不同的 X 和 Y 座標值。

Hint
在一般的視窗系統,左上角為原點,向右為 X 座標的正向,向下為 Y 座標的正向。

下一個範例,我們說明如何經由 window 物件的性質來修改視窗的狀態列(Status Line)。一般而言,狀態列是在瀏覽器視窗的最下方,在預設的情況下,當你將滑鼠置於網頁中的一個連結時,瀏覽器就會在狀態列秀出此連結的網址。欲改變瀏覽器狀態列的文字,可將文字指定至下列兩個性質:

請見下列範例:

Example(winStatus01.htm):

在上述範例中,我們將瀏覽器視窗的預設狀態列改成「這是我的預設狀態訊息」,但是當使用者將滑鼠放在「清華大學」時,狀態列的訊息則會改為「清華大學的首頁」,而不會像一般瀏覽器出現清大首頁的網址,這是因為我們使用 onMouseOver 事件(當滑鼠置於連結時)來觸發一段 JavaScript 的程式碼,並進而改變 window.status。特別要注意的是:此段程式碼必須回傳 true,否則 window.status 的改變將不會發生,請見上述範例的原始檔:

原始檔(winStatus01.htm):(灰色區域按兩下即可拷貝)
<html>
<head>
<meta HTTP-EQUIV="Content-Type" CONTENT="text/html; charset=big5">
</head>

<body>
<h2 align=center>如何改變 window 物件的狀態列</h2>
<hr>

<script>window.defaultStatus="這是我的預設狀態訊息";</script>

<a href="http://www.nthu.edu.tw" onMouseOver="window.status='清華大學的首頁'; return true">清大首頁</a><br>
<a href="http://www.nctu.edu.tw" onMouseOver="window.status='交通大學的首頁'; return true">交大首頁</a><br>
<a href="http://www.ntu.edu.tw" onMouseOver="window.status='台灣大學的首頁'; return true">台大首頁</a><br>

<hr>
</body>
</html>

Hint
有些平台(例如 XP)上的 IE 瀏覽器,在預設的情況下是不會顯示狀態列。在這種情況下,你可以使用瀏覽器的下拉式選單「檢視/狀態列」來設定顯示狀態列。

在 window 物件之下,最重要的物件就是 document,有關於 document 物件的幾個常用到的性質,請見下列範例:

Example(docProp02.htm):

上述範例的主網頁原始檔如下:

原始檔(docProp02.htm):(灰色區域按兩下即可拷貝)
<html>
<head>
<meta HTTP-EQUIV="Content-Type" CONTENT="text/html; charset=big5">
</head>

<body>
<h2 align=center>document 物件的重要性質</h2>
<hr>


<script>
document.write("document.location = <font color=red>"+document.location+"</font>(本頁的網址)<br>");
document.write("document.URL = <font color=red>"+document.URL+"</font>(本頁的網址)<br>");
document.write("document.referrer = <font color=red>"+document.referrer+"</font>(連結到本頁的前一頁網址)<br>");
document.write("document.lastModified = <font color=red>"+document.lastModified+"</font>(本頁的最後修改時間)<br>");
document.write("document.fileModifiedDate = <font color=red>"+document.fileModifiedDate+"</font>(本頁的最後修改時間)<br>");
document.write("document.fileUpdatedDate = <font color=red>"+document.fileUpdatedDate+"</font>(檔案修改日期)<br>");
document.write("document.fileCreatedDate = <font color=red>"+document.fileCreatedDate+"</font>(檔案產生日期)<br>");
document.write("document.fileSize = <font color=red>"+document.fileSize+"</font>(檔案大小)<br>");
document.write("document.bgColor = <font color=red>"+document.bgColor+"</font>(網頁背景顏色)<br>");
document.write("document.fgColor = <font color=red>"+document.fgColor+"</font>(網頁前景顏色)<br>");
document.write("document.linkColor = <font color=red>"+document.linkColor+"</font>(文字連結顏色)<br>");
document.write("document.alinkColor = <font color=red>"+document.alinkColor+"</font>(點選中的文字連結顏色)<br>");
document.write("document.vlinkColor = <font color=red>"+document.vlinkColor+"</font>(點選後的文字連結顏色)<br>");
document.write("document.defaultCharset = <font color=red>"+document.defaultCharset+"</font>(預設的字元集)<br>");
document.write("document.cookie = <font color=red>"+document.cookie+"</font>(小餅乾的字串值)<br>");
document.write("document.protocol = <font color=red>"+document.protocol+"</font>(使用的傳輸協定)<br>");
document.write("document.mimeType = <font color=red>"+document.mimeType+"</font>(MIME 資料格式)<br>");
document.write("document.security = <font color=red>"+document.security+"</font>(安全憑證資訊)<br>");
</script>

<hr>
</body>
</html>

上述範例中,最常用的性質就是 document.lastModified,可以傳回網頁最後修改時間,讓其他使用者知道此網頁的有效性。

此外,一個常見的應用,就是要防止其他網頁的盜連,所使用的 document 的性質是:

範例如下:

Example(referrer01master.htm):

在上述範例中,如果我們直接從「主網頁」點選「被保護的網頁」,則可以直接顯示「被保護的網頁」。但是如果我們直接將「被保護的網頁」的網址貼在瀏覽器的網址列(或點選其它網頁中含有「被保護的網頁」的連結),JavaScript 可由 document.referrer 偵測這種「盜連」的情況,因此不會顯示「被保護的網頁」,而會直接轉址到「主網頁」。採用這種機制,可以確保自己的底層網頁內容不會被「盜連」,而一定要從主網頁進入。上述範例的原始檔如下:

原始檔(referrer01master.htm):(灰色區域按兩下即可拷貝)
<html>
<head>
<meta HTTP-EQUIV="Content-Type" CONTENT="text/html; charset=big5">
</head>

<body>
<h2 align=center>使用 document.referrer 以防盜連:主網頁</h2>
<hr>

此頁是主網頁,由此可以合法連到<a href="referrer01slave.htm">被保護的網頁</a>

<hr>
</body>
</html>

被保護之網頁的原始檔如下:

原始檔(referrer01slave.htm):(灰色區域按兩下即可拷貝)
<html>
<head>
<meta HTTP-EQUIV="Content-Type" CONTENT="text/html; charset=big5">
</head>

<body>
<h2 align=center>使用 document.referrer 以防盜連:被保護的網頁</h2>
<hr>

<script>
if (document.referrer.indexOf("referrer01master.htm")==-1){
	// 限制此頁必須是由"referrer01master.htm"的超連結連過來
	alert("連結失敗!\ndocument.referrer="+document.referrer);
	alert("請從主網站進入本頁");
	document.location = "referrer01master.htm";	// 轉址至主網頁
} else {
	alert("連結成功!\ndocument.referrer="+document.referrer);
}
</script>

這是被保護網頁的內容。

<hr>
</body>
</html>

如果我們將被保護之網頁網址直接貼到瀏覽器的網址列,瀏覽器會經由 document.referrer 來判斷是否合格,並進行必要之轉址。

若要測試客戶端所用的瀏覽器,可以使用 navigator 物件的各種性質,範例如下:

Example(navProp02.htm):

上述範例的原始檔如下:

原始檔(navProp02.htm):(灰色區域按兩下即可拷貝)
<html>
<head>
<meta HTTP-EQUIV="Content-Type" CONTENT="text/html; charset=big5">
</head>

<body>
<h2 align=center>navigator 物件的幾個重要性質</h2>
<hr>


<script>
document.write("navigator.appName = "+navigator.appName+"(瀏覽器名稱)<br>");
document.write("navigator.appVersion = "+navigator.appVersion+"(瀏覽器主要版本)<br>");
document.write("navigator.appminorVersion = "+navigator.appMinorVersion+"(瀏覽器次要版本)<br>");
document.write("navigator.appCodeName = "+navigator.appCodeName+"(瀏覽器代碼)<br>");
document.write("navigator.cpuClass = "+navigator.cpuClass+"(CPU 類別)<br>");
document.write("navigator.platform = "+navigator.platform+"(作業系統平台)<br>");
document.write("navigator.systemLanguage = "+navigator.systemLanguage+"(瀏覽器預設語言)<br>");
document.write("navigator.userLanguage = "+navigator.userLanguage+"(使用者預設語言)<br>");
document.write("navigator.cookieEnabled = "+navigator.cookieEnabled+"(是否允許使用小餅乾)<br>");
</script>

<hr>
</body>
</html>

換句話說,我們只要使用 navigator 物件的各種性質,就可以知道使用者的瀏覽器類別、版本、CPU 類別、平台、是否支援小餅乾之類的資訊,對於我們撰寫跨平台的 JavaScript 程式碼非常有用。

看了上面的範例,各位讀者一定有一個疑問:一個物件到底有什麼性質呢?還有這些性質代表什麼意義呢?事實上,隨著瀏覽器的演進,每一個物件所包含的性質是越來越多,因此若能直接由 JavaScript 來列出網頁文件中的物件所具有的性質,那就再好不過了!我們這裡有個 JavaScript 的函數 listProp(obj, objName),可以列出一個物件的所有性質,其原始碼如下:

原始檔(listProp.js):(灰色區域按兩下即可拷貝)
// 列印物件性質
function listProp(obj, objName) {
	for (var i in obj)
		document.writeln(objName+".<font color=red>"+i+"</font> = <font color=green>"+obj[i]+"</font><br>");
}

在上述程式碼中,obj 是傳入函數的物件變數,objName 則是物件名稱,局部變數 i 則會依次等於物件的每一個性質名稱,obj[i] 則是對應性質的值,我們再用 document.writeln 的方法來將這些資訊印出至網頁。

舉例來說,若要列出 document 物件所具有的性質,可利用 listProp.js 的函數,範例如下:

Example(docProp01.htm):

上述範例的完整原始檔案如下:

原始檔(docProp01.htm):(灰色區域按兩下即可拷貝)
<html>
<head>
<meta HTTP-EQUIV="Content-Type" CONTENT="text/html; charset=big5">
</head>

<body>
<h2 align=center>"document" 的性質列表</h2>
<hr>
<a href="http://www.nthu.edu.tw">清大首頁</a><br>
<a href="http://www.nctu.edu.tw">交大首頁</a><br>
<a href="http://www.ntu.edu.tw">台大首頁</a>
<hr>

<script src="listProp.js"></script>
<p><h3>"document" 的性質列表:</h3>
<p><script>listProp(document, "document")</script>

<hr>
</body>
</html>

由此範例可見 document 物件有許多性質,這些性質都可由上述方法逐一列出。若出現的性質是 [object],代表此性質是另一個物件,因此我們可以再次列出此物件的性質,例如,document.links 是另一個物件,代表此文件中所含的連結,因此我們可以再次利用 lispProp.js,印出 document.links 的所有性質,如下:

Example(docLinkProp01.htm):

上述範例的完整原始檔案如下:

原始檔(docLinkProp01.htm):(灰色區域按兩下即可拷貝)
<html>
<head>
<meta HTTP-EQUIV="Content-Type" CONTENT="text/html; charset=big5">
</head>

<body>
<h2 align=center>"document.links" 的性質列表</h2>
<hr>
<a target=_blank href="http://www.nthu.edu.tw">清大首頁</a><br>
<a target=_blank href="http://www.nctu.edu.tw">交大首頁</a><br>
<a target=_blank href="http://www.ntu.edu.tw">台大首頁</a>
<hr>

<script src="listProp.js"></script>
<p><h3>"document.links" 的性質列表:</h3>
<p><script>listProp(document.links, "document.links")</script>

<hr>
</body>
</html>

同理,我們可以對 window 或是 navigator 物件的性質進行完整的列表,相關範例可見本書之範例光碟:

我們也可以使用 DOM 的各種物件與方法來立即切換音樂(包含 MIDI、MP3 和 wma 音樂)與圖片,請見下列範例:

Example(bgSound01.htm):

你可以點選「換背景圖片」來由亂數選取背景,也可以點選「換背景音樂」來由亂數選取背景音樂。上述範例的原始檔如下:

原始檔(bgSound01.htm):(灰色區域按兩下即可拷貝)
<html>
<head>
<meta HTTP-EQUIV="Content-Type" CONTENT="text/html; charset=big5">
</head>

<body>
<h2 align=center>動態切換音樂和背景</h2>
<hr>

<script>
function changeBackground() {
	var imgURL = ["bg1.gif", "bg2.gif", "bg3.gif", "bg4.jpg", "bg5.gif"];
	document.body.background = "image/" + imgURL[Math.floor(Math.random()*5)];
}
function changeMusic() {
	var soundURL = ["tomorrow.mid", "如果雲知道.mid", "原來你什麼都不想要.mid", "膽小鬼.mid", "聽海.mid"];
	myMusic.src = "music/" + soundURL[Math.floor(Math.random()*5)];
}
</script>

<bgsound id="myMusic" src="" loop="infinite">
<form>
<center>
<input type="button" value="換背景圖片" onClick="changeBackground()">
<input type="button" value="換背景音樂" onClick="changeMusic()">
</center>
</form>

</body>
</html>

本範例的相關技術重點,說明如下:

一般而言,每一個 HTML 的標籤就是一個物件,我們可以使用 id 標籤來存取此物件,例如設定 id=idValue。一般而言,如果此標籤是在 document 的下一層(或是位於 <body> 及 </body> 內且不被其他標籤所包夾),則我們可以直接使用此 idValue 來存取此物件,例如上述範例的 myMusic.src。但是,如果標籤是在層層 DOM 之下(例如表單內的文字欄位),那麼直接使用 idValue 是無效的,此時只要 idValue 在整個網頁是唯一的,我們可以使用兩種方法來取得此物件: 當然,對於每一個標籤,我們還是可以使用 name 標籤來指定此物件,但取用比較麻煩,必須從 document 開始抓取,例如如果一個文字欄位(name=myText)位於一個表單(name=myForm),那麼此文字欄位所對應的物件就是 document.myForm.myText.
JavaScript 程式設計與應用:用於網頁用戶端